How to use
Platform support
This library does not contain any external dependency and can be used on any platform that supports C++11. It is composed of a header and a static .a libary provided for the following platforms:
Linux
Windows
MacOs apple silicon
Esp32s3
Teensy4.X
Note
If you need a precompiled version for another platform, please contact us at CONTACT . We will be happy to provide it in the next release!
Processing times examples for microcontrollers:
Size / microcontroller |
ESP32-S3(-O2): proc time (max FFT freq) |
Teensy4X (OPT_faster): proc time (max FFT freq) |
|---|---|---|
64 |
100us (10kHz) |
15us (66kHz) |
128 |
175us (5.7kHz) |
30us (33kHz) |
256 |
325us (3kHz) |
61us (16kHz) |
512 |
650us (1.5kHz) |
126us (8kHz) |
1024 |
1290us (775Hz) |
262us (3.8kHz) |
2048 |
2630us (380Hz) |
540us (1.85kHz) |
4096 |
5390us (185Hz) |
1240us (800Hz) |
Tip
The possibility to build the library on embedded device and on host computer allows for quick development and easy tuning of the parameters using replays of real data!
Usage
1. Select configurations
In the project used, the .ini (generally platformio.ini) file has to provide the compilation configuration, depending on the FFT size. The configuration include the header path (using -I), and the static précompiled static library adapted to the platform used (using -L and -l).
example
For example with a 256 FFT size for an ESP32-S3, the following lines have to be added in the .ini file:
1build_flags =
2    -O2
3    -DBOARD_HAS_PSRAM
4    ...
5    -I lib/libDM_SRX_fft/src/model_fft256/
6    -L lib/libDM_SRX_fft/src/static_libs
7    -l SrxFFT256_esp32s3.a
2. Create and initialize object
Important
API ref: SRX_MODEL_FFT, SRX_MODEL_FFT::initialize()
After the inclusion, create the stepable object. Here we choose a FFT size (window) of 256 samples:
#include "libDM_SRX_FFT256_interface.hpp"

SRX_MODEL_FFT fft;
In any function that is executed one time before loop (setup for arduino …):
fft.initialize();
2. Initialize inputs
Important
API ref: SRX_MODEL_FFT, SRX_MODEL_FFT::modelInputs, SRX_MODEL_FFT::setInputs()
Before the while loop, create a modelInputs object:
SRX_MODEL_FFT::modelInputs fftInputs = SRX_MODEL_FFT::modelInputs();
3. Feed the model and step it
Important
The library handles the buffering of the inputs, so the idea is not to feed it with a table. Just feed it with a single value at each loop iteration. In the while loop, feed the FFT object with the inputs and step it: For example, with an accelerometer output (for more informations about sensors reading, see : libDM_icm42688 doc):
1// Get sensors data
2icm.readFifo();
3resIMU = icm.getOutput();
4
5// Set accelerometer Z acceleration as FFT input
6fftInputs.signalInput = resIMU.gAccelData[2];
7fft.setInputs(fftInputs);
8fft.step();
4. Get outputs
After the step, outputs specified in SRX_MODEL_FFT::modelOutputs will be updated and can be retrieved
with accessing the pointer content.
For example to print the FFT vector obtained:
1for (size_t i = 0; i < 128; i++)
2{
3    Serial.println("FFT[" + String(i) + "] = " + String(fft.getOutputs().fftVector[i]));
4}
Decode FFT results
The FFT vector output gets arbitrary frequency axis. To link these values to physical frequency, the input signal sampling rate has to be known. As the buffering is included, the way to use the class is to call step() at constant rate, and getting the output fft vector when needed. The corresponding frequency is given by the step of the FFT (ie: 500Hz application using a 256 size FFT, the block will output a vector with a size of 128.
To get the frequency associated with the vector, you must do step=500/256, the vector is graduated this way :
vect = [0:step:500/2-step] = [0 1.95 3.9 … 247.65] Hz
Example of use on virtual signal with a 256 size FFT
Example 1
We will generate a virtual signal with a sampling rate of 100Hz. This signal will be compose of a 10Hz frequency sine wave with an amplitude of 2, and a 20Hz frequency sine wave with an amplitude of 1:
 1#include "libDM_SRX_FFT256_interface.hpp"
 2
 3SRX_MODEL_FFT fft;
 4
 5void setup()
 6{
 7    fft.initialize();
 8    SRX_MODEL_FFT::modelInputs fftInputs = SRX_MODEL_FFT::modelInputs();
 9
10    while (curTime < 5.F)
11    {
12        // Generate a virtual signal (2 sine waves at 10Hz and 50hz frequency, with 2 and 1 values for amplitude)
13        float curSin =
14            2 * std::sin(2 * 3.14 * 10 * curTime) + 1 * std::sin(2 * 3.14 * 20 * curTime);
15
16        fftInputs.signalInput = curSin;
17        fft.setInputs(fftInputs);
18        fft.step();
19        curTime += 0.01F; // 100Hz sampling rate
20    }
21
22    // Print the FFT vector and associated frequency
23    float step = 100.F/256.F;
24    for (size_t i = 0; i < 128; i++)
25    {
26        Serial.println("Amplitude[" + String(step * i)
27                    + "] = " + String(fft.getOutputs().fftVector[i]));
28    }
29}
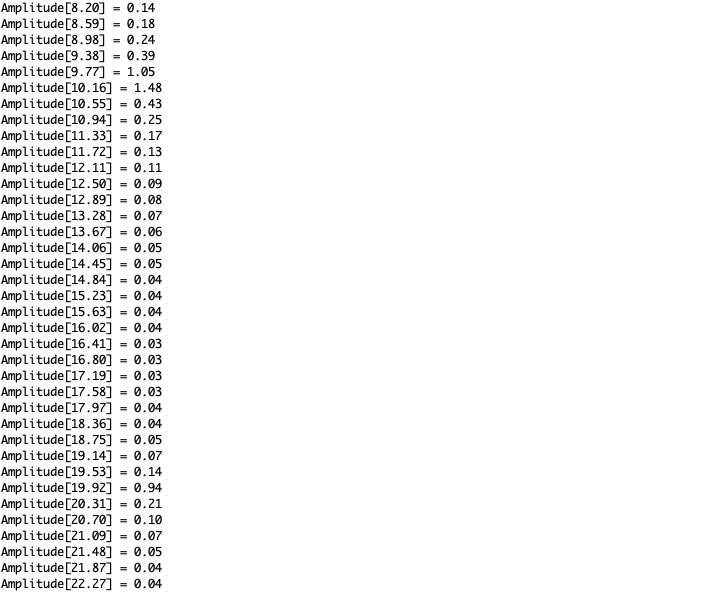
Of course the result is not so precise, lets try with a 1024 size FFT!
Example 2
First we modify the compilation options in the .ini file to use a 2048 size FFT:
1build_flags =
2    -O2
3    -DBOARD_HAS_PSRAM
4    ...
5    -I lib/libDM_SRX_fft/src/model_fft2048/
6    -L lib/libDM_SRX_fft/src/static_libs
7    -l SrxFFT2048_esp32s3.a
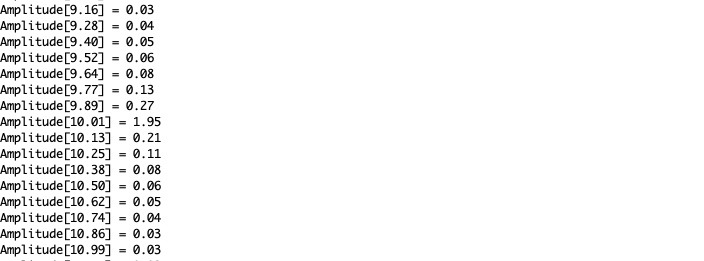
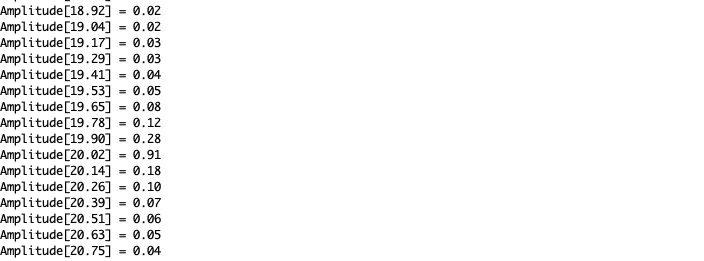
We then include the correct header and modify a little the options. The sampling frequency will now be 250Hz:
 1#include "libDM_SRX_FFT2048_interface.hpp"
 2
 3SRX_MODEL_FFT fft;
 4
 5void setup()
 6{
 7    fft.initialize();
 8    SRX_MODEL_FFT::modelInputs fftInputs = SRX_MODEL_FFT::modelInputs();
 9
10    while (curTime < 10.F) // 10 seconds is enough to fill 2500 samples, perfect for 2048 size FFT
11    {
12        // Generate a virtual signal (2 sine waves at 10Hz and 50hz frequency, with 2 and 1 values for amplitude)
13        float curSin =
14            2 * std::sin(2 * 3.14 * 10 * curTime) + 1 * std::sin(2 * 3.14 * 20 * curTime);
15
16        fftInputs.signalInput = curSin;
17        fft.setInputs(fftInputs);
18        fft.step();
19        curTime += 0.004F; // 250Hz sampling rate
20    }
21
22    // Print the FFT vector and associated frequency
23    float step = 250.F/2048.F;
24    for (size_t i = 0; i < 512; i++)
25    {
26        Serial.println("Amplitude[" + String(step * i)
27                    + "] = " + String(fft.getOutputs().fftVector[i]));
28    }
29}
We got a more precise result: amplitude is more precisely detected, resolution is improved, and we could theoretically detect up to 125Hz frequency signals, compared to 50Hz in the previous example.
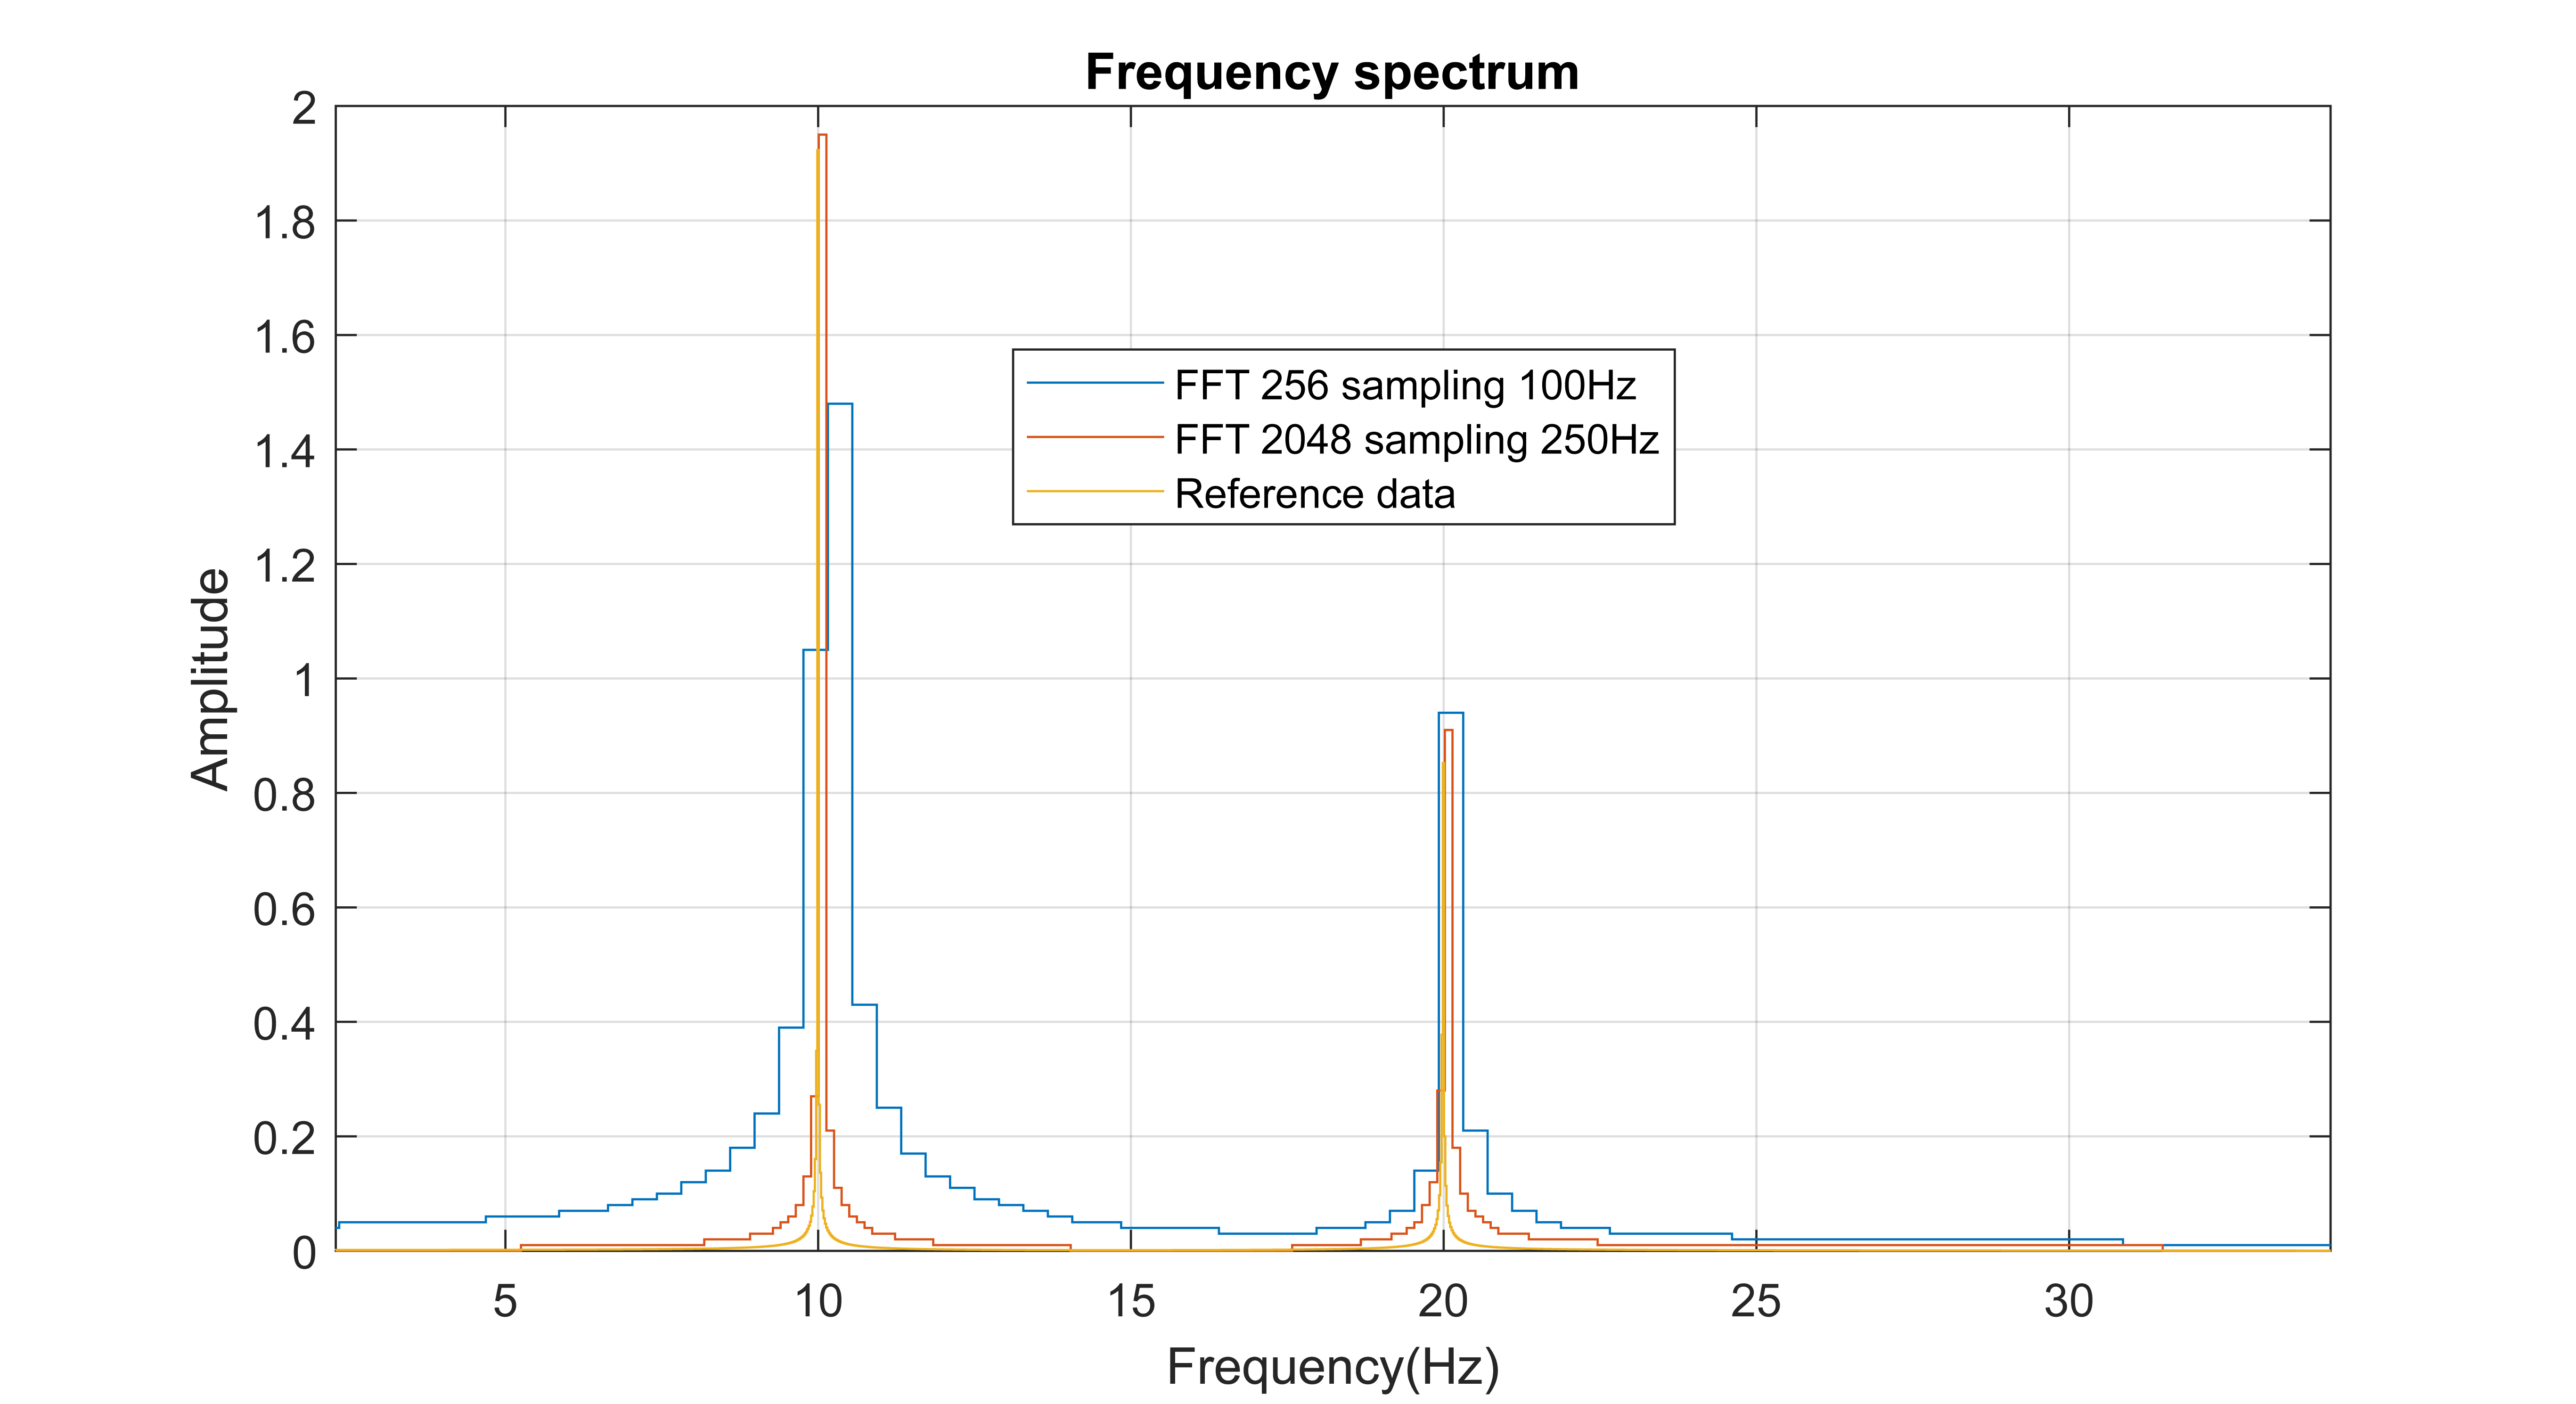
The matching between the sampling frequency and the FFT windows size has to be taken into account to get the best results, depending on the signals to be analyzed.
Of course the FFT computation time is the primary factor to take into account when choosing sampling frequency!